반응형
- typeahead 사용법 정리 -
typeahead는 검색어 자동완성 기능을 제공하는 자바스크립트 라이브러리다.
jQuery에 있는 autocomplete 도 있는데 둘 다 사용해보니까 typeahead가 사용법이 간단해 괜찮은 거 같다.
우선 typeahead 를 사용하기 위해서는 링크에서 typeahead를 다운로드한다.
다운로드한 파일 중 사용하게 될 파일은 typeahead.bundle.js 이다.
jQuery 기반 라이브러리라 jQuery가 필수다.
<script src="/resource/jquery-3.5.1.js" ></script>
<script src="/resource/typeahead.bundle.js"></script>
typeahead는 따로 기본 CSS가 없어서 아래의 Style Sheet를 복붙 한다.
    <style>
        .typeahead-div{width : 400px;}
        .tt-menu {width :100%;}
        .typeahead,.tt-query,.tt-hint {height: 30px;padding: 8px 10px;font-size: 24px;line-height: 30px;border: 2px solid #ccc;-webkit-border-radius: 8px;-moz-border-radius: 8px;border-radius: 8px;outline: none;}
        .typeahead {background-color: #fff;}
        .typeahead:focus {border: 2px solid #0097cf;}
        .tt-query {-webkit-box-shadow: inset 0 1px 1px rgba(0, 0, 0, 0.075);-moz-box-shadow: inset 0 1px 1px rgba(0, 0, 0, 0.075);box-shadow: inset 0 1px 1px rgba(0, 0, 0, 0.075);}
        .tt-hint {color: #999}
        .tt-dropdown-menu {margin-top: 3px;padding: 8px 0;background-color: #fff;border: 1px solid #ccc;border: 1px solid rgba(0, 0, 0, 0.2);-webkit-border-radius: 8px;-moz-border-radius: 8px;border-radius: 8px;-webkit-box-shadow: 0 5px 10px rgba(0,0,0,.2);-moz-box-shadow: 0 5px 10px rgba(0,0,0,.2);box-shadow: 0 5px 10px rgba(0,0,0,.2);}
        .tt-suggestion {width: calc(100%-20px);padding: 3px 10px ;font-size: 18px;line-height: 24px;color: black;cursor: pointer;}
        .tt-suggestion.tt-cursor {color: #fff;background-color: #cccccc;}
        .tt-suggestion p {margin: 0;font-size: 18px;text-align: left;}
    </style>
1. typeahead 기본 사용법
typeahead 는$.typeahead( 플러그인에 대한 설정, 결과 데이터에 대한 설정 )으로 옵션을 구분한다.
다른 옵션들이 있긴하지만 밑에 나열한 옵션정도면 충분하다.
let substringMatcher = function(stringArray) {
            return function findMatches(searchWord, cb) {
                let matches, substringRegex;
                // 추천 목록으로 보여질 배열
                matches = [];
                // searchWord로 만들어질 정규 표현식
                substrRegex = new RegExp(searchWord, 'i');
                //정규 표현식으로 가지고 있는 배열에서 탐색
                $.each(stringArray, function(i, str) {
                    if (substrRegex.test(str)) {
                        //정규 표현식 일치하면 추천 목록에 푸시
                        matches.push(str);
                    }
                });
                cb(matches);//뿌려주는 함수
            };
};

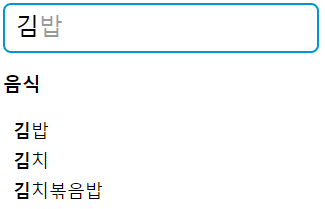
let states = ['김밥','김치','김치볶음밥','신라면','진라면','불닭볶음면','참치김밥','야채김밥'];


$('.typeahead').typeahead({
        hint: true, // 나머지 글자가 자동으로 보여지는지
        highlight: true,// 일치하는 문자 하이라이팅
        minLength: 1    // 검색 시작하는 최소 문자 길이
    },
    {
        limit: 5, // 자동완성 목록에 보여질 개수
        name: 'states',
        source: substringMatcher(states),	// source가 검색어 추천에 목록으로 뿌려질 목록이다.
        templates: {
            header: '<h3 class="league-name">음식</h3>',// 추천 목록 헤더
            empty: [
                '<div class="empty-message">',
                '일치하는 결과가 없습니다',
                '</div>'
            ].join('\n')    // 일치하는 결과가 없을때
        }
    }
);
위와 같은 경우는 자동완성 기능의 검색어가 미리 정해져 있는 경우에 사용할 수 있는 방법으로 배열에 검색어를 담아서 사용한다.
2. typeahead ajax 사용법
요즘 대부분의 경우에는 ajax를 통해서 자동완성 기능을 구현한다.
GET /search/{searchKeyword} 라는 API가 있고 응답이 {code: String, item : Array} 인 경우
자동완성을 구현하는 예제이다.
$('.typeahead').typeahead({
        hint: true, // 나머지 글자가 자동으로 보여지는지
        highlight: true,// 일치하는 문자 하이라이팅
        minLength: 1    // 검색 시작하는 최소 문자 길이
    },
    {
        name: 'tags',
        source: function (query, syncResults, asyncResults) {
            return $.ajax({
                url: "/search/"+query,  // query 는 검색창에 입력된 단어이다.
                type: 'get',
                success: function (response) {
                    //response = { code:"200",item:['김밥','김치','김치볶음밥','신라면','진라면','불닭볶음면','참치김밥','야채김밥'] }
                    let item = response.item;
                    return asyncResults(item);  //asyncResults 에 배열을 넘기면 된다.
                }
            })
        }
    }
);
asyncResults 에 배열을 넣어주면 ajax를 통한 자동완성을 구현할 수 있다.

다른 참고할 만한 예제는 여기에 있다.
반응형
